DineAmix
On Line WebOrder HOW TO
If you have previously registered an account with your
favorite restaurant simply;
- Area Code: Select your area code from the pick list.
- Phone Number: Enter
your 7 digit phone number without spaces.
- Password: Enter your
password and Press the Sign in button.
If you have forgotten your password press the "Lost
Password" button from above.
- Area Code: Select your area code from the pick list.
- Phone Number: Enter your
7 digit phone number without spaces.
- E-Mail: Enter your E-mail
address and press "Send Password" to have your password sent to your
e-mail account.
Press the "Cancel" button to return to the Sign In screen.
If you are a NEW client press the "Register"
button from the top screen.
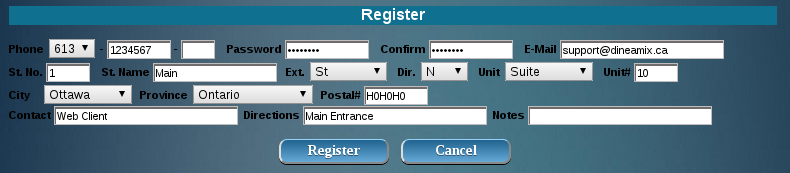
- Area Code: Select your
area code from the pick list. If your area code does not appear in the
list then the restaurant does not service your location.
- Phone Number: Enter you 7
digit phone number without any spaces or hyphens.
- (optional) Phone Extension:
Enter up to 5 digits for your phone extension. This will help if
the restaurant needs to contact you.
- Password: Enter your
password. It must be between 8 and 12 digits long without spaces or
special characters. (i.e. %&!$# etc.)
- Confirm: Re-Type your
password so we can confirm it's accuracy against the Password field.
- E-Mail: Enter the E-Mail
address you with to receive notifications at.
- Street Number: Enter a
numeric number up to 5 digits that is your street address.
- Street Name: Enter your
street name here. DO NOT enter any extensions such as Ave or St. Street
Extensions are selected from the next list.
- Street Extensions: Select
from the list your street extension.
- (optional) Street Direction:
If your street has a street direction such as North, South, Etc. Select
it from the list.
- Unit: Select your Unit
type from the list.
- (optional) Unit Number:
Enter a Unit Number if it applies to your address.
- City: Choose your city
from the list.
- Province: Choose your
province from the list.
- Postal Code: Enter your
postal code here. Do Not use spaces or Hyphens. i.e K0K0K0 (good)
K0K-K0K (bad)
- Contact: Enter your name
of a nick name to be used by the store in case they need to contact you.
- (optional) Directions:
Enter the nearest cross street or delivery instructions such as front
door. Side of house. etc.
- (optional) Notes: Enter
any special instructions for the driver here.
Press the "Register" button to register your account. An e-mail will be
sent confirming your registration and the order screen will appear.
Press the "Cancel" button at any time to return to the Sign In screen.
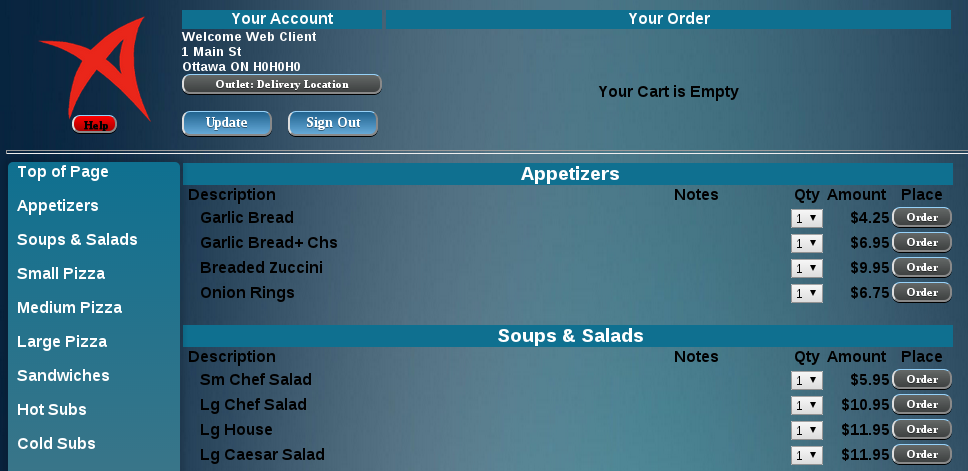
The main order screen is broken up in to 5 sections.
- Logo and Help: Located in
the upper left hand corner this area is used to display the restaurants
logo and help button. Touch the Logo at any time to return to the
restaurant's main web page. You have already discovered what the "Help"
button does.
- Your Account: This area
right of the Logo area displays some basic information about your
account and the location that serves your area.
- Sign Out: At
any time you may exit the order system by pressing this button. You
cart contents will be saved and available to you when your return.
- Update: Use
this button to "Update" your account information. Only address and and
contact information can be updated. Your phone number cannot be
changed at this time.

- Update: Press this
button to record your changes.
- Cancel: Press this
button the exit the update screen and return to the order screen.
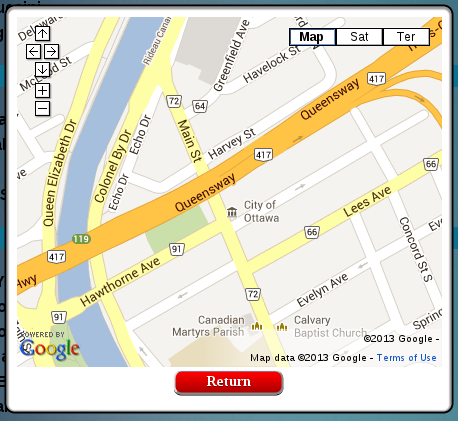
- If your Outlet is show as a button pressing it will display a
map of your restaurant location.
- Your Order: Located in
the Upper right hand corner this area is used to display your current
order contents.
- Menu Index: Located on
the left hand side of the screen this area will quickly place you in
the catergorie you wish to order from.
- Main Body: The area list
the Categories, Items available for order within a category.
- Add an Item from the Menu:
Either press the category name on the left to scroll down to the
desired category and use the browsers scroll bar on the right to
navigate to the desired category. Select the number of items to be
ordered from the Qty list to the right of the product name. Press the
Order button to add the selected item to your order.
- Increasing the item quantity:
Press the green button next to your item to increase the quantity by 1.
- Decrease the Item Quantity:
Press the red button to decrease the item quantity by 1. If a quantity
of zero is reached the item will be removed from the list.

- Clear Order: To remove
all items from your order press the "Clear Order" button.
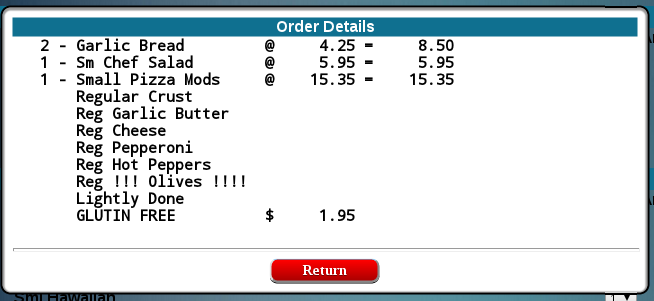
- Review Order: To view
your order and any special instructions press the "Review Order"
button. Press the "Return" button to return to your order.
Once you have selected all the desired items for your order press
the "Place Order" button. Press the "Return" button to continue
ordering.
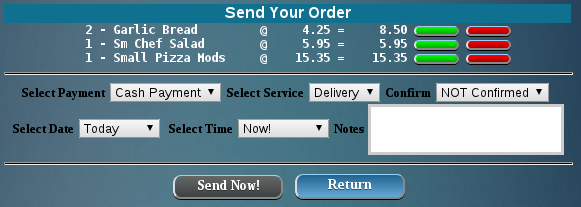
- Payment Type: Select the payment method you will use to pay for your order.
- Service: Choose from Delivery or Pick Up from the list to inform the restaurant the service you require.
- Confirm: Select Confirmed from the drop down list to indicate you have reviewed your order and you are ready to place your order.
- Date: Select the date you wish to have your order placed. Selected from Today or Tomorrow.
- Time: You can have your ordered prepared at some time in the future by choosing a different time.
- Notes: Enter any special instruction for the restaurant here.
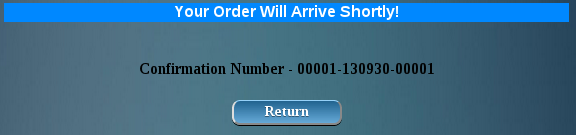
Press the "Send Now" to send your order to your restaurant outlet. You
will receive a confirmation number on screen and an e-mail will be sent
with the same information.
We hope you found this document helpful. For more information or
assistance call DineAmix Inc. at 888-411-6636 or E-Mail
support@dineamix.ca
The DineAmix Team

